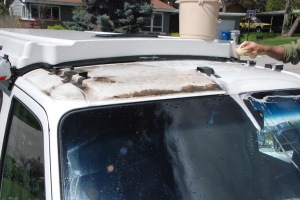
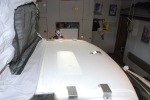
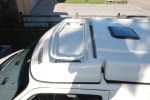
On our recent trip to California the luggage rack on the EVC made so much noise that I finally climbed up there and took a look at it to see what the trouble was. The recessed corners of the plastic shell had cracked, thus making the rack’s connection to the Eurovan pretty flimsy. Even driving slowly through town, the noise was horrendous, like some roof-mounted troll thought the EVC was a piñata.
I duct-taped the rack and ordered the repair kit from GoWesty. Below is an account of my repair, which was as involved, time consuming, and difficult as I dreaded it would be. But now it’s done, and – most importantly – silent and way more resilient than Winnebago, in keeping with the American manufacturing credo of “barely good enough,” designed it to be.
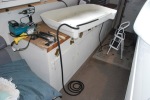
Removing the Luggage Rack
This was the easiest part. GoWesty’s instructions are simple and worked just fine: unbolt everything and remove the rack.
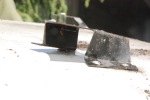
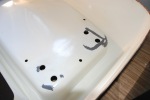
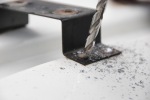
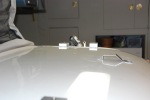
What I saw after the rack was off was disgusting. Filth, slime, cracking silicone, and rusted, twisted metal brackets. I cleaned everything, let it dry completely, and then drilled the rivet heads off the original brackets so I could remove and replace them. Winnebago only riveted the outside of each bracket; the inside was “glued” onto the roof and the glue job on every bracket had long ago failed.
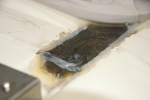
Winnebago filled the channel on each side of the Eurovan roof with a block of plastic which they siliconed or glued in place. I’ve read about this being a major leak-point for the campers, and sure enough big cracks were opening up around the edges of the plastic blocks. I scrubbed the cracks and filled them with clear silicone.
Repairing the Luggage Rack Shell
Since I’d had good luck with JB Weld on other plastic repairs (e.g., the battery cover under the hood) I decided to use it on the luggage rack. I cleaned the plastic, sanded the areas around the cracks, and cleaned it all with acetone.
I applied generous amounts of JB Weld to both the top and the bottom of each crack (waiting about 12 hours for the bottom to dry before turning it over and doing the top), making sure that I covered the long crack extensions at each corner. After the top had dried completely (24 hours), I painted the dark gray JB Weld with touch-up paint that I got from an auto paint store (paint code: R902, Arctic White). They mixed the paint while I waited; the dealer wanted twice the amount ($25) and two weeks to order it!
After repairing the cracks, I removed the old seal, which had rusted extensively on the inside, since there were bare metal clips holding the seal in place. I sanded and acetoned the edge of the plastic to remove the rust stains, and then installed the GoWesty replacement seal. This seal has a rubber bulb on one side, and the instructions didn’t indicate whether the bulb went on the inside or outside, so I called GoWesty and they got back to me quickly, indicating that the bulb goes on the inside. After installing it, I could easily see why: it forms an actual seal (unlike the original) that keeps the air from getting under the rack and buffeting it. The original seal and the shoddy material and installation of the original brackets allowed the rack over time to get buffeted to the point of cracking at the corners. UV damage also contributed, as the plastic is pretty brittle now.
Installing the New Brackets
This is the part I dreaded most because (a) it required drilling holes in the roof and (b) I had never used a rivet gun. GoWesty’s instructions were clear and simple as usual, and worked fine. What they don’t explain are the finer points of installing rivets, which is not their responsibility. As with installing the Fiamma awning, drilling holes in the Eurovan makes me nervous. With the luggage rack, there was the added difficulty of not drilling all the way through the headliner. [UPDATE: A nice person sent me a comment saying that “Drill Stops” (about $4 at Home Depot) can prevent you from drilling through the headliner – GoWesty should update their instructions and recommend people use those to save their headliners.]
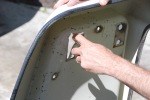
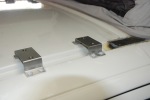
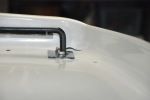
To install the brackets, first I siliconed the bottom of all four holes, then placed the bracket over the existing two holes. I installed the first rivet too loosely, which meant drilling it out and redoing it; luckily I had purchased an extra box of 3/16” rivets as GoWesty supplies only the exact number of rivets required (20). I learned from my mistake that to get a tight rivet you need to squeeze the rivet gun incrementally to get the full pull on the rivet. It took me two or three incremental pulls (squeeze, open the rivet gun handle, “swallow” the rivet back down to the head, squeeze again, “swallow” and squeeze until it breaks off the disposable rivet shaft).
After riveting the bracket into the two existing holes, I drilled (3/16” bit) the two inside holes. On the first one I went clean through the headliner. There is very little space between the roof metal and the headliner, which made drilling the other 9 holes quite nerve-wracking. Despite being extremely careful and drilling very slowly, I still made four holes in the headliner. Not much you can do there (anyone have a suggestion to prevent and/or repair the holes in the headliner?).
Once all brackets were riveted in place I siliconed over all the rivets and leading edges of the brackets to keep water from getting into the holes and leaking through the headliner. To my horror, after looking at the photos I’d just taken of the newly installed brackets, I realized I’d installed the front bracket backwards! I had to drill out all four rivets and re-install that bracket, which didn’t take me long since I’d improved my skill level with the rivet gun.
Re-installation of the Luggage Rack
After dismantling the rack, I sanded and repainted the rusted top brackets that secure the plactic shell to the roof-riveted brackets. Re-installing the entire rack was pretty straightforward, but required some elbow grease to get the holes in the plastic lined up with the threaded holes in the brackets. I bolted one side down loosely, then had to pull pretty hard on the other side to get those bolts threaded.
I’m sad to report that my time-consuming JB Weld job on the cracks failed at the two front corners, which were the biggest cracks in the rack. The back corner repairs held, and the top brackets have enough surface space to hold the plastic securely in place. After tightening the top brackets I siliconed the cracks in the front corners and can only hope they’ll last and keep from getting bigger. Since the rack isn’t vibrating and getting buffeted like it did originally, I’m optimistic. In the meantime, I’ll keep my eyes out for a flawless replacement plastic shell (haven’t had any luck finding one yet; any suggestions are welcomed!).
Road Test
The impetus for getting this job done was an impending trip to the Olympic Peninsula. I’m happy to report that the damned thing was silent the whole trip, even during near-hurricane force winds in a couple spots. The cracks don’t seem to have grown, and I’m relieved to have this one behind me. Whether I’ll actually use the rack is another matter!

Nice job. Great pics. Thanks for the post. As far as a new rack if the cracks widen, it appears you could line the underside of the plastic rack with sheets of fiberglass impregnated with resin available at any auto parts store. Similar to a boat repair or any fiberglass repair. Enjoy the road!
By: steve on December 28, 2011
at 10:19 am
Thanks, Steve. That’s just what I’m about to do. When I was a kid I made skateboards with fiberglass sheets and resin, and figured that would be the way to go on the luggage rack. I’ll post some photos when I’ve got it done.
By: Bob McMichael on December 28, 2011
at 11:20 am
Thanks for recording this, it’s given me the information and confidence to take on the repair. After buying my ’95, I got caught in a crosswind at 70 MPH and the rest was history! JR-Denver
By: John Rewinkel on October 28, 2012
at 7:17 pm
Hi Bob…Thanks a lot for documenting this. My 2000 started making some noise on a recent trip and by the time I stopped to check it out, I had some large cracks in it. I was able to duct tape it down and finish the trip, but now need to deal with it. Q: Is there any issue driving it around without the shell on? Here’s some pics of my damage: http://www.flickr.com/photos/vo/sets/72157637092497843/
By: Vince Outlaw on October 29, 2013
at 1:03 pm
Hi Vince, thanks for your comment. I don’t think there would be any issue driving without your luggage rack shell, except for likely noise at higher speeds. Go Westy would be the folks to ask, though, if you were really concerned. Good luck on the repair job!
By: Bob McMichael on October 29, 2013
at 1:47 pm
Thanks Bob for the feedback…I’ve got a conversation going with the Go Westy folks also! VO
By: Vince Outlaw on October 29, 2013
at 2:04 pm
Bob, Thanks for a great description here on how to replace the brackets. I’m attempting this next week and I’m wary about the drilling part. How far would you say the distance is between the roof and the headliner (in order to put the drill stop in?). Thanks,
Rick
By: Rick on May 9, 2014
at 11:58 am
It’s been a while, Rick. But I do remember going through the headliner and wishing I’d put a drill stop on the bit. I was surprised how shallow it was, so maybe start with a 1/4″ on the first one and see if that does it and then – if not – increase it a tiny bit…
By: Bob McMichael on May 10, 2014
at 10:06 pm
Thanks Bob. I’m in Boise too and I enjoy your blog. Our luggage rack just failed and blew off at 70 mph on the way to Portland for Christmas. It is toast, so I’ll have to buy a new one from GoWesty or directly from Winnebago. The plastic completely failed all the way around the brackets and handles, leaving two large holes in the base of the rack. I didn’t have much noise since I’d replaced the seal with the GoWesty seal aboput three years ago. Surprisingly, the original brackets seem to be in good shape. But I will probably replace them as you did.
By: Paul on December 29, 2014
at 10:30 am
I would not recommend the bulb seal for the luggage rack. It will keep water in and over time cause rust. You need a gap under the rack to allow the water to drain. You can push the original type seal down to where there is no gap or it’s almost touching the roof. The rubber bulb will trap water in.
By: Dave on April 3, 2015
at 11:40 am
Hi Bob,
Thanks for the article. It is very informative. Do you know the type of plastic of the Winnebago EuroVan luggage rack?
Thanks,
Vincent
By: Vincent van Rooijen on November 15, 2015
at 10:16 am
I don’t know what kind of plastic; guessing ABS. GoWesty could tell you, though, if it’s important.
By: Bob McMichael on November 15, 2015
at 11:11 am
Hi Bob,
This article was super helpful and I’ve referenced it several times as we’ve taken a while to get our repair done. We didn’t have the “towel bars” that attach to the brackets and hold the roof down and had to get them fabricated.
Question for you: we’re just now able to try to put it all together and there is a 1/2″-3/4″ gap between the top of the bracket and the bottom of the plastic roof. Did you find this too? Did you just tighten down the bolts to get it snug? We’re afraid we’ll break the Fiberglas. Any thoughts? We’re considering getting some spacers to put between the two.
Thanks again for writing all of this up!
Regards,
Laurie
By: lececere on August 31, 2016
at 4:46 pm
Thanks, Laurie. We sold the EV a few years ago, but I do remember there being a gap between the bracket and the plastic roof, and I just tightened it down. I’m not sure it was as big as your gap, but I was careful to keep from bending it too much. It seemed okay when I tightened it all down. The one thing that didn’t work was the JB Weld to fix the cracks, and I did end up fixing that with fiberglass and resin, which worked great (I even reinforced the corners that weren’t cracked). Anyway, thanks for the comment and good luck. I kind of wish we still had the EV but it was fun while it lasted!
By: Bob McMichael on August 31, 2016
at 6:25 pm
Thanks so much Bob! We’re just about to sell our EV. I know I’ll miss it too! Appreciate your time!
By: Laurie on September 1, 2016
at 6:53 am
Daunting task – thanks for the heads-up on this project which I do not look forward to starting as soon as the part is back in stock
By: Arnold on June 16, 2017
at 1:45 pm
Thanks for posting. I accomplished this project with confidence thanks to you. two of my brackets had come unglued, yet the rack still stayed on somehow. I dove into the project because the rain gulleys were leaking water into the cabin, so the real benefit for me was removing the old silicone (or whatever) and waterproofing the gutters under the racks.
By: Kelly Muldrow on November 5, 2017
at 9:51 pm
So glad it worked out, Kelly. I miss our Eurovan (but love our truck camper). Enjoy staying dry and not worrying about rust!
By: Bob McMichael on November 6, 2017
at 6:39 am
You were lucky. Our luggage rack blew off on a windy day in Nebraska last fall. We’ve been looking for replacement ever since. Got the runaround for 4 months from”Usedsuyopsrts.com” Finally told them to take a hike and we’ve recommended our search. Any suggestions??
By: Cathy on July 25, 2018
at 3:16 pm
GoWesty.
By: Bob McMichael on July 25, 2018
at 5:47 pm
Yep, follow Bob’s Rec I did and it worked great. The updated stainless steel brackets are the ticket!
By: John on July 26, 2018
at 12:32 pm
Hi Bob-
Any tips for removing the old glue?
I find the rest of your report confidence building. Thanks a lot!
By: kevin taylor on May 18, 2019
at 11:51 am
Not sure, Kevin. Maybe try Goof Off! or acetone. Good luck!
By: Bob McMichael on May 19, 2019
at 9:08 am
Yes! thank you. goof off worked well.
By: poolsk8r on May 28, 2019
at 1:30 pm
Thanks for the fine report, Bob. Just cracked our luggage rack in an eastern Sierra cross-wind. No chance of repair, but ordered a new one from GoWesty.
By: Russ Bishop on May 24, 2021
at 10:46 am
I’m curious how you did the fiberglass repair on your cracks. You mention that the JB Weld didn’t hold, but the fiberglass worked well.
As I mentioned I was planning to buy a new rack from GoWesty as ours has cracked all around the mounting holes. It would be nice to save $450 if I could actually repair our rack instead.
By: Russ Bishop on May 24, 2021
at 11:09 am
I bought a fiberglass kit from Amazon, and roughened up the cracked area on both sides, and put a couple layers of fiberglass on both sides and it held just fine. We never put anything in the luggage rack, though, so I’m not sure what having weight would have done to it. But it seemed plenty strong. Yeah, I wasn’t too keen on buying a new one. I wish we still had the EV. Loved it.
By: Bob McMichael on May 24, 2021
at 12:04 pm
Thanks Bob! I appreciate your input. I’ve ordered the seal from GoWesty and I plan to get the Bondo fiberglass kit to do the patch. We do love our Eurovan and plan to have it a good many more years.
By: Russ Bishop (@RussBishopPhoto) on May 26, 2021
at 4:35 pm